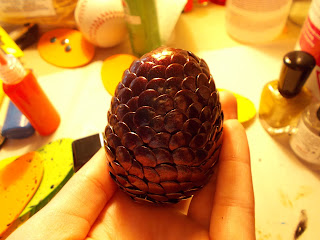
SO, for my first DIY I decided I would do dragon eggs. I love dragons, and I've wanted to do this project ever since I saw it on pinterest a few months ago. Why it took me so long to make them, I'll never know, but here we go!
You'll need:
Styrofoam eggs (I got a nine pack of three different sizes for $5 at JoAnns)
Thumbtacks (a LOT of thumbtacks. You can get packs of 300 at the Dollar Tree, and I bought three.)
Pieces of foam (I got a pack of 24 foam "gift tags" at the Dollar Tree)
Glue (whatever you can find)
Optional:
Black nail polish (this isn't necessary, but it does help- more on that later. I got a bottle of Wet'n Wild "Black Creme" at- guess where- the Dollar Tree)
Colored nail polish (I like metallic polishes best, but use what you like. I used a Formula X polish [bought from Sephora} called "Legend")
Nail polish clear coat (available for a buck at the Dollar Tree)
Alright. So, we start by sticking the thumb tacks into the pieces of foam so we end up with this.
Don't push them all the way down against the foam. They need to be like this-
Unfortunately, I can't tell you how many thumbtacks you'll need. I've made a total of four eggs- three in one size, and one in another. I've used 150 tacks, 133 tacks, 160 tacks, and 244 tacks respectively. The egg I'm showing you used 244 tacks, and they were made in three separate batches. Just know this: make MORE than you think you need.
Once all of your tacks are stuck into the foam, paint them with black nail polish.
Just use the point of a pencil to break them apart.
Now let the black polish dry. Why use the black polish? Because it forms a mostly opaque barrier between the shiny tack and the colored polish. Metallics tend to be streaky, and the polish with silver showing through it just looks weird to me. I usually let the polish dry for an hour, then I go in with one coat of colored polish.
Now let that dry for an hour before adding clear nail polish. This isn't necessary, but I like shiny. This particular polish dries kind of gritty, so I applied two coats of topcoat. Let that dry for AT LEAST 12 hours. Yes, you read that right. Twenty four hours is ideal, but...
Nope. They don't.
Once the tacks are dry enough, take them out of the foam. Now, you can start either from the top of the egg or the bottom- it's your choice. Whichever you choose, stick a tack right in the middle of the end.
Now, you just work on building up a ring around it.
Keep doing this, overlapping the tacks, until you either run out of tacks and have to make more, or until you've filled in all but the last spot. For the last tack, stick the end in a bit of glue (Elmer's, mod podge, superglue, construction glue, whatever's handy) and stick it in place!
Why stick the last tack down? Because there's nothing else to hold it in place, and it'll fall out otherwise. See?
If you're paranoid, paint over that last tack and surrounding tacks with clear nail polish. Otherwise, you're done!
Isn't that just pretty?
If you don't want to paint the tacks, that works too. And it's waaaaaaaaaaaaaaaaaaay quicker.
I hope you enjoyed this (long) post! Now, go forth and create dragon eggs!
See you later! 😃 😏


No comments:
Post a Comment