Saturday, January 20, 2018

Jewelry projects

Today's just going to be a post about some of my jewelry projects from last year and so far this year.  Here lately, I've been enjoying Peyote stitch (at least I think that's what it's called), and I'm not great at it, but it's really relaxing. 
Without further ado...
Wire heart pendant necklace
I have a hard time with wirework hearts, and this is the result of an hour's practice.  I liked how this heart turned out and ended up adding the beads to it and hanging it on a chain. 
Multi-chain heart necklace
It's almost a choker actually.  The pendant came from Walmart.  The necklace was on clearance, but the pendant broke soon after I got it.  I ended up attaching one chain to either side and liked the effect.  On a whim, I started adding more chains, and loved the result! 

Peyote stitch bracelets
Both of these were based off of tutorials I found on pinterest.  The bottom one is definitely my favorite though. 

Chainmail bracelets
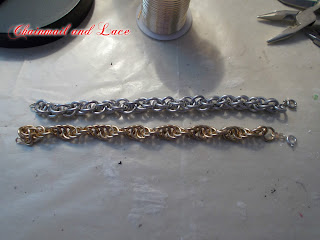
Chainmail weaving was something I did a lot in 2016. I still have all the jump rings lying around collecting dust, and I decided to try a spiral weave.  The silver one is now something I wear everyday.
Statement wirework necklace
Based off a pinterest tutorial.  I still haven't worn this!

Elvish ear cuffs
Another thing that I was obsessed with for a while.  The top pair was a lot of fun to make.  It took nearly a week, but the result was worth it.  I ended up selling it to someone at beauty school.  The bottom pair was prettier in my imagination....  I'm still proud of it though. 
That's all for today.  I have a necklace build I'm planning, so hopefully I'll have pictures of that soon. 
See you later!!
😼🔇🔑🔑🔖☁☂☀🌆

Saturday, January 13, 2018

DIY: How to Age Paper

Hello there.  😉
Today, I'm going to give a tutorial on how I age paper.  There are a few ways of doing this that I'll talk about, but I'll focus mainly on my method.
First off, the paper itself!
My paper of choice?  Doodle paper.   You know, that thin, off-white, tissu-ey paper you probably got when you were a kid?  That stuff.  I was surprised how well it actually worked, since it seems so fragile.  Printer paper doesn't work well- it rips and falls apart too easily.  Construction paper works all right, but, for whatever reason, it crinkled up as it dried and was unusable for it's intended purpose.  Poster board works pretty well.  It's thick which makes it harder to work with, but it takes age pretty well.
Medium of choice?  Coffee.  Alternatives include tea and dirt.  I haven't tried the dirt method, but apparently you bury the paper for a few days/weeks and then dig it up and boom!  Aged paper!  Coffee, obviously, is quicker, and so is tea.  Coffe turns out more brown, and tea is more yellow.
Alright, now.  You'll need-
Paper
Coffee/Tea
Two coffe filters (if using coffee)
A cup half filled with warm water
A tub, sheet pan, sheet of aluminum foil, or something to keep the coffee/tea from going everywhere
WARNING: avoid carpeted areas while doing this project!
(ask me how I know...)

Ok, so looking through the pictures now, they're terrible.  Oh well.  I want to get this post up finally, so picture free it is!
If using coffee, put the grounds into two filters and tie off with a rubber band.  Now, put the satchet in the water.  You're basically brewing a really, really, really cruddy cup of coffee here.  Let it "steep" for a minute, then start dabbing it on your paper, which should be in your container of choice.  You don't want a ton of just brownish water.  I find that squeezing the darker "coffee" out of the filter itself stains better.  
Now, this is what I do, though it does create a rougher finish- before aging the paper, crumple it into a ball a few times and smooth it out.  You'll get a nice texture this way.  You can also do this while the paper is wet, but it's going to be more prone to tearing.
You can also replace the coffee with a tea bag, and the procedure is the same.  The result is definitely yellower though.  
Hopefully you can see the difference- the tea stained paper is on the left, and the coffee on the right.  I have to say, the coffee staining is my favorite.  I use the paper for bookmarks, maps, card, decoupage, etc, etc, etc.  Be creative with it!!
See you soon!  👐💓😏😕😾😰😞

Sunday, January 7, 2018

Steampunk/Victorian projects from 2017

Good evening!  ✧✦✵🌟
So, again today, I don't have an actual tutorial, but I have some inspiration.  Over the past year, I've gotten into the steampunk/Victorian sort of  aesthetic, and I've made some jewelry and crafts to reflect that.  I showed you my steampunk statement necklace in my last post.  So here's a few more things, and a quick rundown on how I made them.  😇

Dragon necklace
This isn't strictly "Steampunk" but it's heavier and more industrial look than I usually go for.  
This is just a dragon pendant from Hobby Lobby, two lengths of handmade chain (18 gauge wire in silver and gold), and a leather string from Joann's.  (And a clasp obviously!!)
I braided the chains and leather, attached the dragon at about the middle and called it good.  The only problem I've had with this necklace is the chains start to slide down the leather and bunch up in the middle.  
 Mechanical heart charm

This charm was inspired the Lindsey Stirling song "Shatter Me".  Specifically the line "Tired mechanical heart beats 'til the song disappears."  So, I made a heart charm out of air drying clay, and once it was dry painted it gold all over.  On the front, I glued small gears (from Hobby Lobby).  On the back, I wanted it to look like the "mechanical heart" was starting to wear out and crack.  I found that dragging a straight pin through the gold paint after it had dried would rip it and create an interesting texture.  I thinned out some black paint with water and filled in the tears in the gold.  Then, I hung it on a strip of leather and called it good.  This is now one of my favorite necklaces- and one I get quite a few comments on!
Mini Victorian jewelry boxes

Both of these were intended to be steampunk at first, but as I worked I found I liked the more romantic and vintage look, so I omitted the gears and chains and what not.  The first one was a jewelry box (the kind that the jewelry comes in).  I didn't want to cover the beautiful gold box itself, so I decorated around it.  I used gold leaf, rhinestones, lace, a lock and a key jewelry charm, and I  also made paper roses based on this tutorial.  I felt I needed a centerpiece in addition to the roses, so I wrote the quote on a piece of aged paper.  (If you didn't recognize the quote, it's from the Lord of the Rings The Fellowship of the Ring.)
The second box started as a setting powder container.  I used mod podge, book pages, and aged paper to decoupage the whole thing; over that, I added a bit of gold leaf.  Then I used buttons, jewelry charms and beads, and lace to decorate the top.  
Steampunk jewelry box
THIS is what happens when I go nuts, and this was my first real steampunk project last year.  I decoupaged an old body butter container with paper and book pages.  I also smeared black acrylic paint around the sides to give it a sooty look.  I painted the inside of the tub black, then started gluing anything and everything to the top.  Buttons, gears, scraps of wires and strings, jewelry findings, and a handmade clock face.  This is definitely one of my favorite projects from last year, and turned out surprisingly well considering it was a late-Sunday-afternoon-I'm-super-bored-what-do-I-do project!
I'm working on a tutorial for how to age paper right now, so keep an eye out for that.  
Have a great day!!!  See you around!  👻💢😉💝❤👾

Tuesday, January 2, 2018

Steampunk Necklace Build

Hello, there.  😀😀
Well, it's a new year so time for new projects.  As I was digging through one of my craft drawers yesterday, I dug out a box of some odds and ends left over from other projects.  I'd had ideas for a steampunk themed statement necklace in my head for a while, so I sat down and started working.  I'm pretty sure I didn't pay for half of the stuff that went into this necklace- the only thing I remember buying are the gears and the charms.  I know most of the chains were broken chains I've gathered from friends and family.  This isn't necessarily a tutorial, more of an inspiration post.  So click through, and hopefully I can inspire you.  


I'll be back a few more steampunk inspired projects soon, and I'm working on getting some photos from the last six months at school.  So stay tuned!
See you around.  💮🌸🌹🍀🐙🐂